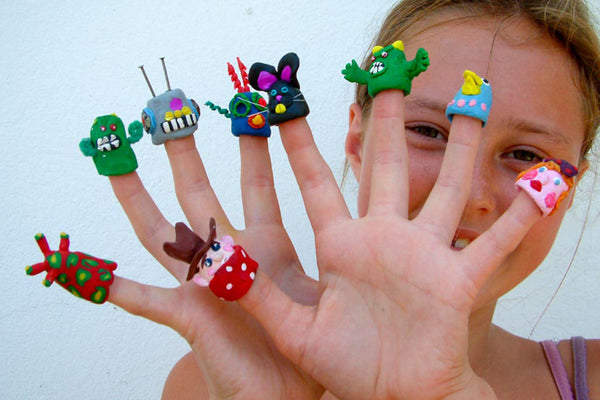
Fimo, a versatile modelling material, offers endless possibilities for creative play. Children are captivated by its easy-to-use nature, vibrant colors, and mess-free experience. In this post, we'll guide you through the steps of making charming finger puppets using Fimo.
Materials Needed:
Fimo in assorted colors
Modelling tools (optional)
Small objects like nuts and bolts (optional)
Toothbrush (for whiskers)
Instructions:
Gather your materials and ensure you have Fimo in various colours. Remember to consult the manufacturer's guidelines for baking instructions, as Fimo needs to be hardened in the oven.
Start by taking a small lump of Fimo, roughly the size of your thumb. This will serve as the base for your finger puppet.
Shape the Fimo around your forefinger, moulding it to form the body of the puppet. Use your other hand to smooth and refine the shape as desired.
Pinch off tiny quantities of different coloured Fimo to create the various features of your puppet, such as the ears, nose, eyes, and mouth. Remember, a little goes a long way with Fimo, so start with small amounts and add more if needed.
Press the coloured pieces onto the main body of the puppet. The Fimo will naturally stick together without the need for additional adhesive.
For added fun and creativity, consider incorporating small objects like nuts and bolts into your finger puppet designs. Raiding the toolbox can lead to some truly unique and imaginative characters!
To create whiskers, you can repurpose the bristles of a toothbrush. Gently press them into the puppet's face, positioning them where you'd like the whiskers to be.
Once you've finished sculpting your finger puppets, follow the baking instructions provided by the manufacturer to harden the Fimo. This step will ensure the longevity of your creations.
Other Materials for Finger Puppets:
Felt: Felt is a versatile and easy-to-work-with material that comes in various colours. It can be easily cut and stitched to create finger puppets with different shapes and textures.
Craft Foam: Craft foam sheets are lightweight, flexible, and available in an array of vibrant colours. They can be easily cut, glued, and shaped into finger puppets of various designs.
Paper: Card or construction paper can be used to make simple and temporary finger puppets. Children can draw or colour their favourite characters on paper, cut them out, and fold them to fit around their fingers.
Socks or Gloves: Repurposing old socks or gloves is a fun and sustainable option. By adding eyes, mouth, and other embellishments, you can transform these everyday items into adorable finger puppets.
Pipe Cleaners: Pipe cleaners, also known as chenille stems, can be shaped into different characters. You can create animal figures or even bend them into finger-sized loops for an instant puppet.
Pom-Poms: Colourful pom-poms can be glued or sewn onto a base material to form the head or body of a finger puppet. They add a playful and tactile element to the finished puppet.
Buttons: Buttons can serve as eyes, noses, or other features for finger puppets. By selecting buttons of various shapes and sizes, you can create diverse facial expressions for your puppet characters.
Fabric Scraps: Leftover fabric scraps can be utilized to add clothing, accessories, or textured elements to your finger puppets. Cut out small pieces and sew or glue them onto the puppet bodies.
Note: Remember to supervise children during the crafting process, follow safety guidelines, and ensure the proper handling and storage of Fimo materials.
Final word
Why not bring a favourite story to life by crafting all the characters, such as the Big Bad Wolf and the Three Little Pigs?
Making finger puppets is easy and fun and it's a great way to bring more dialogue into your child's play.